随着HTTPS的不断的普及,我在HTTP下的折腾也越来越无法得到满足,看着别人家的网站都有绿锁,就总觉得自己的会不安全。强迫症驱使,也决定在网站上把绿锁给弄出来。研究了几个免费的SSL证书,发现阿里就有提供Symantec颁发的个人免费证书,有效期一年,因此决定就用它玩玩儿。
申请阿里SSL证书
- 阿里提供的Symantec免费DV证书,在产品页找CA证书服务,或者云盾证书服务。在购买页我们选择
免费型DV SSL。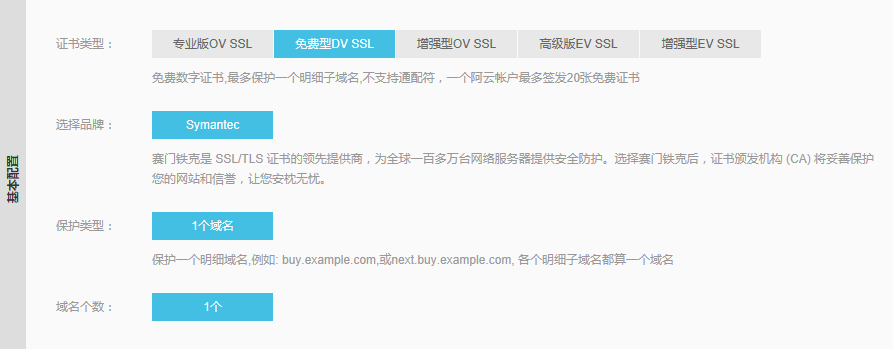
- 购买之后,我们进入控制台,找到安全(云盾)-证书服务,补全SSL证书信息,提交审核。
流程:补全信息 - 提交审核 - 查看进度 - 颁发证书 - 下载证书
详细的补全信息,审核流程可以看参考资料1 - 当申请审核通过后会颁发证书,可以在下载页面中下载,并且下载页面也已经提供了不同服务器证书安装方法,其实照着操作即可。
下图是阿里提供的Nginx下的SSL配置: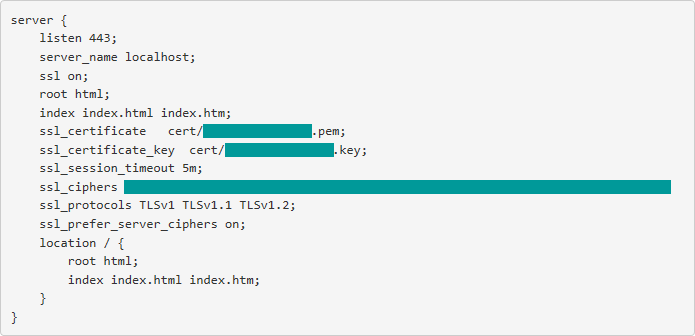
设置SSL
- 我们在Nginx的conf文件目录中新建cert文件夹,将我们下载的证书上传到该文件夹中。
- 修改conf中的nginx.conf文件,修改80端口的server为如下:
server {
        listen       80;
        server_name  www.****.com ****.com;
        rewrite ^(.*) https://$server_name$1 permanent;
}
这里是将80端口的请求重定向到https上。
3. 修改443端口的server:
server {
        listen 443;
        server_name www.**********.com **********.com;
        ssl on;
        root html;
        index index.html index.htm index.php;
        ssl_certificate   cert/**********.pem;
        ssl_certificate_key  cert/**********.key;
        ssl_session_timeout 5m;
        ssl_ciphers **********
        ssl_protocols TLSv1 TLSv1.1 TLSv1.2;
        ssl_prefer_server_ciphers on;
        location / {
            root D:/Web/**********;
            index index.html index.htm index.php;

            # config for wordpress begin
            if (-f $request_filename/index.html){
                rewrite (.*) $1/index.html break;
            }
            if (-f $request_filename/index.php){
                rewrite (.*) $1/index.php;
            }
            if (!-f $request_filename){
                rewrite (.*) /index.php;
            }
            # config for wordpress end

        }
        location ~ \.php$ {
            root           D:/Web/**********;
            fastcgi_pass   127.0.0.1:9000;
            fastcgi_index  index.php;
            fastcgi_param  SCRIPT_FILENAME  $document_root$fastcgi_script_name;
            include        fastcgi_params;
        }
}
其中的location \ 是增加了对wordpress中的固定链接的配置(参考资料2)。注意将上述配置的******根据实际情况替换。
重新启动Nginx服务。
修改站点地址及内链地址
- 修改wordpress设置中的wordpress地址及站点地址为https://********。
- 在我们主题的模板中,找到function.php中,尾部增加如下代码:
//WordPress SSL at 2016/12/29 update
add_filter('get_header', 'fanly_ssl');
function fanly_ssl(){
    if( is_ssl() ){
        function fanly_ssl_main ($content){
            $siteurl = get_option('siteurl');
            $upload_dir = wp_upload_dir();
            $content = str_replace( 'http:'.strstr($siteurl, '//'), 'https:'.strstr($siteurl, '//'), $content);
            $content = str_replace( 'http:'.strstr($upload_dir['baseurl'], '//'), 'https:'.strstr($upload_dir['baseurl'], '//'), $content);
            return $content;
        }
        ob_start("fanly_ssl_main");
    }
}
目的是将我们内链的图片等地址的http用https代替。
好了,到这里我们就已经将wordpress整站改成了https,当然如果外链了其他的网址,页面还是会显示不安全,所以需要挨个排查。
现在可以开心的打开我们的网站了。