我们常常在系统中需要用到权限,然而每次新定义一项权限时,就需要在我们的系统权限列表中录入一次。如一个用户管理的模块可能需要在系统的权限列表中相应的增加查询用户,新增用户,修改用户以及删除用户的权限。这样繁琐的体力劳动看起来既不便捷,也不优雅。是否可以省略掉中间的录入环节呢?我们想要既方便的将我们定义的权限加入到系统的权限列表中,不需要录入,又能够方便的来进行功能权限的检查,好了,那么下面这种方式可能适合你。
中心思想:
- 定义一个我们自己的注解@Function,包含权限编码,权限名称,以及排序。
- 在我们的Controller的类以及方法上通过自定义注解来定义我们的权限。
- 通过发射来扫描所有的Controller,获取到所有带注解的类及方法。
- 将扫描出来的注解类及方法上,注解的信息插入到我们的权限表中。
- 最后根据权限表中的数据生成权限树或这列表。
那我们最终要实现的效果就是下面这样: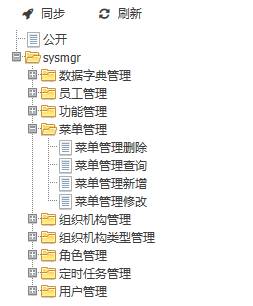
接下来我们看具体的实现:
1.定义注解
@Retention(RetentionPolicy.RUNTIME) // 注解会在class字节码文件中存在,在运行时可以通过反射获取到
@Target({ElementType.TYPE,ElementType.METHOD}) // 定义注解的作用目标**作用范围字段、枚举的常量/方法
@Documented // 说明该注解将被包含在javadoc中
public @interface Function {
    /**
     * 功能代码
     * @return
     */
    String func() default "";
    /**
     * 功能描述
     * @return
     */
    String describe() default "";
    /**
     * 默认排序
     * @return
     */
    int order() default 0;
}
2.使用自定义注解
以我们的用户管理为例:我们在类名以及方法名上,使用我们的自定义注解@Function
@Controller
@RequestMapping("/sysmgr/user")
@Function(func="sysmgr.user",describe="用户管理")
public class UserController extends BaseController {
    @Resource
    private IUserService userService;
    @Resource
    private IAuthLocalService authLocalService;
    private static final Logger log = Logger.getLogger(UserController.class);// 日志文件

    /**
     * 获取用户分页列表
     * @param pageReq
     * @param user
     * @param response
     * @return
     * @throws Exception
     */
    @Function(func="sysmgr.user.query",describe="查询")
    @RequestMapping("/list")
    public @ResponseBody PageResp<UserBean> pageList(PageReq pageReq, UserQo userQo, HttpServletResponse response) throws Exception {
        Map<String, Object> filter= new HashMap<String, Object>();
        if (!StringUtils.isEmpty(userQo.getUsername())) {
            filter.put("username", StringUtils.formatLike(userQo.getUsername()));
        }
        if (!StringUtils.isEmpty(userQo.getEmpName())) {
            filter.put("empName", StringUtils.formatLike(userQo.getEmpName()));
        }
        pageReq.setFilter(filter);
        PageResp<UserBean> page= userService.findPaging(pageReq);
        return page;
    }

    /**
     * 新增
     * @param entity
     * @return
     */
    @Function(func="sysmgr.user.save",describe="新增")
    @RequestMapping(value="/save",method=RequestMethod.POST)
    public @ResponseBody OperationResult<?> save(UserBean entity){
        OperationResult<?> result=userService.save(entity);
        return result;
    }

    /**
     * 修改
     * @param entity
     * @return
     */
    @Function(func="sysmgr.user.update",describe="修改")
    @RequestMapping(value="/update",method=RequestMethod.POST)
    public @ResponseBody OperationResult<?> update(UserBean entity){
        OperationResult<?> result=userService.update(entity);
        return result;
    }

    /**
     * 删除用户
     * @param id
     * @return
     */
    @Function(func="sysmgr.user.delete",describe="删除")
    @RequestMapping(value="/delete",method=RequestMethod.POST)
    public @ResponseBody OperationResult<?> delete(Integer id){
        OperationResult<?> result;
        UserBean entity=new UserBean(id);
        result=userService.delete(entity);
        return result;
    }
}
3.扫描所有带@Function注解的类及方法。
首先我们定义一个Bean,它用来统一保存我们@Function的信息:
public class FunctionField {
    private String code;
    private String describe;
    private String parentCode;
    private int order;
    private Class<?> type;

    public FunctionField(){}

    public FunctionField(String code, String describe,int order,String parentCode,Class<?> type) {
        this.code=code;
        this.describe= describe;
        this.parentCode= parentCode;
        this.type=type;
    }
    public FunctionField(String code, String describe,int order,String parentCode) {
        this.code=code;
        this.describe= describe;
        this.order= order;
        this.parentCode= parentCode;
    }

    public String getDescribe() {
        return describe;
    }
    public void setDescribe(String describe) {
        this.describe = describe;
    }
    public int getOrder() {
        return order;
    }
    public void setOrder(int order) {
        this.order = order;
    }
    public Class<?> getType() {
        return type;
    }
    public void setType(Class<?> type) {
        this.type = type;
    }
    public String getCode() {
        return code;
    }
    public void setCode(String code) {
        this.code = code;
    }
    public String getParentCode() {
        return parentCode;
    }

    public void setParentCode(String parentCode) {
        this.parentCode = parentCode;
    }

    @Override
    public int hashCode() {
        return code.hashCode();
    }

    @Override
    public boolean equals(Object obj) {
        if(!(obj instanceof FunctionField)){
            return false;
        }
        FunctionField field = (FunctionField) obj;
        return (this.code.equals(field.getCode()));
    }
}
接下来的这一部分是我们的核心,扫描所有的类,获取我们需要的@Function信息:
public class FunctionUtils {
    private static List<FunctionField> _allFunctionList;
    private static String SCAN_NAME_SPACE="com.wte.story";

    /**
     * 系统所有功能项
     * @return
     */
    public static List<FunctionField> allFunctionList(){
        if(_allFunctionList==null){
            List<FunctionField> list = getRequestMappingValue(SCAN_NAME_SPACE);
            _allFunctionList =new ArrayList<FunctionField>(new HashSet<FunctionField>(list));
        }
        return _allFunctionList;
    }

    /**
     * 在指定命名空间下的Controller中,扫描带@Function注解的Controller及带有@Function注解的方法
     * @param packageName
     * @return
     */
    private static List<FunctionField> getRequestMappingValue(String packageName) {
        List<Class<?>> classes = new ArrayList<Class<?>>();
        // 是否循环迭代
        boolean recursive = true;
        String packageDirName = packageName.replace('.', '/');
        // 定义一个枚举的集合 并进行循环来处理这个目录下的文件
        Enumeration<URL> dirs;
        List<FunctionField> functionList = new ArrayList<FunctionField>();
        try {
            // 读取指定package下的所有class
            dirs = Thread.currentThread().getContextClassLoader().getResources(packageDirName);
            while (dirs.hasMoreElements()) {
                URL url = dirs.nextElement();
                String protocol = url.getProtocol();
                // 判断是否以文件的形式保存在服务器上
                if ("file".equals(protocol)) {
                    // 获取包的物理路径
                    String filePath = URLDecoder.decode(url.getFile(), "UTF-8");
                    // 以文件的方式扫描整个包下的文件 并添加到集合中
                    findAndAddClassesInPackageByFile(packageName, filePath, recursive, classes,functionList);
                }
            }
        } catch (IOException e) {
            e.printStackTrace();
        }

        for (Class<?> classType : classes) {
            addFunction(classType,functionList);
        }
        return functionList;
    }

    /**
     * 获取包下的所有类
     * @param packageName
     * @param packagePath
     * @param recursive
     * @param classes
     */
    private static void findAndAddClassesInPackageByFile(String packageName, String packagePath, final boolean recursive,
            List<Class<?>> classes,List<FunctionField> functionList) {
        File dir = new File(packagePath);
        if (!dir.exists() || !dir.isDirectory()) {
            return;
        }
        File[] dirFiles = dir.listFiles(new FileFilter() {
            // 自定义过滤规则 如果可以循环(包含子目录) 或是以.class结尾的文件(编译好的java类文件)
            public boolean accept(File file) {
                return (recursive && file.isDirectory()) || (file.getName().endsWith("Controller.class"));
            }
        });
        for (File file : dirFiles) {
            if (file.isDirectory()) {
                findAndAddClassesInPackageByFile(packageName + "." + file.getName(), file.getAbsolutePath(), recursive,
                        classes,functionList);
            } else {
                String className = file.getName().substring(0, file.getName().length() - 6);
                try {
                    classes.add(
                            Thread.currentThread().getContextClassLoader().loadClass(packageName + "." + className));
                } catch (ClassNotFoundException e) {
                    e.printStackTrace();
                }
            }
        }
    }

    /**
     * 获取类中的带@Function注解的类方法
     * @param classType
     * @return
     */
    private static void addFunction(Class<?> classType,List<FunctionField> functionList) {
        Function field = classType.getAnnotation(Function.class);
        if(field!=null){
            addFunctionField(field.func(),functionList,field,classType);

            if (classType != null) {
                Method[] methods = classType.getMethods();
                for (Method m : methods) {
                    Function meta = m.getAnnotation(Function.class);
                    if (meta != null) {
                        FunctionField sf = new FunctionField(meta.func(), field.describe()+meta.describe(),meta.order(),field.func());
                        functionList.add(sf);
                    }
                }
            }
        }
    }

    /**
     * 递归获取类方法上的自定义注解,并构造权限树的结构。
     * @param func
     * @param functionList
     * @param field
     * @param classType
     */
    private static void addFunctionField(String func,List<FunctionField> functionList,Function field ,Class<?> classType){
        String parentStr="";
        int index=func.lastIndexOf(".");
        if(index>=0){
            parentStr= field.func().substring(0, index);

            if(func.equals(field.func())){
                functionList.add(new FunctionField(func, field.describe(),field.order(),parentStr,classType));
            }else{
                functionList.add(new FunctionField(func, func,field.order(),parentStr,null));
            }
            addFunctionField(parentStr,functionList,field,classType);
        }else{
            if(func.equals(field.func())){
                //判断是否根节点,如果是,则显示根名称,如sysmgr.xxx,则描述显示sysmgr。
                functionList.add(new FunctionField(func, field.describe(),field.order(),"-1",null));
            }else{
                functionList.add(new FunctionField(func, func,field.order(),"-1",null));
            }

        }
    }
}
我们在调用时只需要使用List apiFuncList = FunctionUtils.allFunctionList();就可以拿到所有的权限信息。
接下来只需要将这个封装好的List保存到数据库中即可,因为我们已经构造出了整个功能树所必须的信息,Id以及ParentId。
4.存储扫描到的权限
我们仅需要一个按钮来触发下面的方法即可。
/**
     * 从api同步系统功能
     */
    public OperationResult<?> syncFunction() {
        List<FunctionField> apiFuncList = FunctionUtils.allFunctionList();
        FunctionTempBean tempBean= new FunctionTempBean();
        //1.从api获取,存入功能的临时表
        for(FunctionField field:apiFuncList){
            tempBean.setFuncCode(field.getCode());
            tempBean.setFuncDescribe(field.getDescribe());
            tempBean.setFuncOrder(field.getOrder());
            tempBean.setParentCode(field.getParentCode());
            tempBean.setUpdateTime(DateUtils.getCurrentDate());
            tempBean.setUpdateUser(UserContext.getCurrentUser().getUserId());
            functionTempDao.save(tempBean);
        }
        //2.删除功能表中不存在于临时表中的功能
        try{
            this.deleteFromDbNoExistWithApi();
        }catch(Exception ex){
            functionTempDao.deleteAll();
            return new OperationResult<Integer>(OperationResultType.Error,0);
        }

        //3.插入临时表中多出来的功能,防止某一功能移动到新增的类下,所以先新增
        this.saveToDbFromFuncTemp();

        //4.更新功能表中与临时表共有的功能
        this.updateToDbFromFuncTemp();

        //5.删除临时表中的纪录
        functionTempDao.deleteAll();

        return new OperationResult<Integer>(OperationResultType.Success,1);
    }
5.从库中查询构造功能权限树
这一部分就相对简单了:
/**
     * 查询功能树
     */
    public List<FunctionTreeBean> getFunctionTree() {
        List<FunctionBean> functionDbList = dao.findAll();
        List<FunctionTreeBean> treeList = new ArrayList<FunctionTreeBean>();
        for (FunctionBean bean : functionDbList) {
            if (funcRootId.equals(bean.getParentCode())) {
                FunctionTreeBean treeModel = new FunctionTreeBean();
                treeModel.setId(bean.getFuncCode());
                treeModel.setText(bean.getFuncName());
                List<FunctionTreeBean> tempChildren=getChildren(bean, functionDbList);
                if(tempChildren.size()>0){
                    treeModel.setChildren(tempChildren);
                    treeModel.setState(false);
                }else{
                    treeModel.setState(true);
                }
                treeList.add(treeModel);
            }
        }
        return treeList;
    }

    /**
     * 递归获取叶子节点
     * @param bean
     * @param list
     * @return
     */
    private List<FunctionTreeBean> getChildren(FunctionBean bean,
        List<FunctionBean> list) {
        List<FunctionTreeBean> nodeList = new ArrayList<FunctionTreeBean>();
        for (FunctionBean model : list) {
            if (bean.getFuncCode().equals(model.getParentCode())) {
                FunctionTreeBean tree = new FunctionTreeBean();
                tree.setId(model.getFuncCode());
                tree.setText(model.getFuncName());

                List<FunctionTreeBean> tempChildren=getChildren(model, list);
                if(tempChildren.size()>0){
                     tree.setChildren(tempChildren);
                     tree.setState(false);
                }else{
                    tree.setState(true);
                }
                nodeList.add(tree);
            }
        }
        return nodeList;
    }
以上就是这个功能的核心代码。看吧,这样我们每次增加一个权限,仅需在写Controller以及方法的时候写上@Function注解,再点一下同步出发的按钮,那么系统中的功能就自动的被添加到我们的这棵权限树中了,减少了中间人工的录入,是不是方便了许多。