
小程序从诞生到现在应该有两年多的时间,从开始只对企业开放,到现在任何的开发者都可以体验,可以说小程序已经变得非常流行。用完即走的思想为用户打开了新的一扇窗户,用户不再需要关注,而是更加聚焦于自己的需求,同时也使用户不再受制于App,增强体验。今年7月份,百度也开放了小程序,可见小程序已经完全被企业所接受。年中我去深圳,通过扫码打开小程序进站乘车非常方便,与站在广告牌前下载App,验证身份,关联支付方式等一系列繁琐的操作相比,显然小程序更加适用这一场景。再加上微信这一强大的传播性,某些环境下开发一款小程序或许是一个优质的选择。
小程序的官方已经有了完整的开发文档,并且经过两年多的实践,微信中也已经有了非常非常多的案例。后面分享我在开发一款简单的小程序过程中,所收获的一些经验,这次先从登陆开始。
1. 登陆
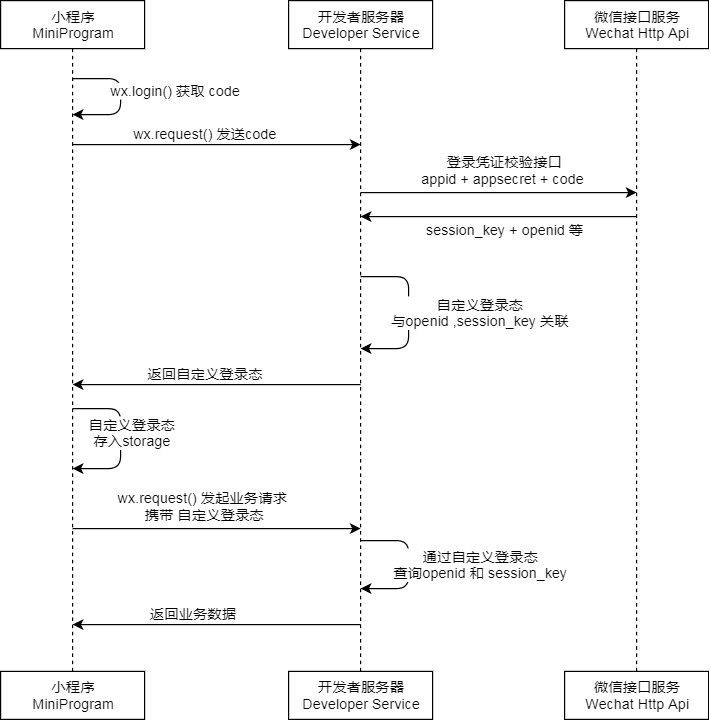
其实从上图官方给的登陆时序图来看,已经非常清晰。直接调用登陆接口wx.login,拿到登陆凭证code后,在我们的服务端调用验证接口,获取session_key等信息,生成3rd_sessionId,并响应给我们的小程序。小程序在所有的业务请求中,都要带着这个3rd_sessionId去后台验证,有效则返回结果。
1.1 登陆前端
前端的登陆这里简单分享下代码实现:
getAuthKey: function () {
    return new Promise(function (resolve, reject) {
      wx.login({
        success: res => {
          // 获取code
          var code = res.code;
          // 使用res.code在后端获取openId, sessionKey以及unionId
          wx.request({
            url: api.getAuthUrl('/wechat/auth/' + code),
            method: 'GET',
            success: function (info) {
              if (info.data.resultCode == "SUCCESS") {
                // 获取登陆后的3rd_sessionId,异步存储在本地
                wx.setStorageSync("SessionId", info.data.data);
                resolve(info);
              } else {
                console.log('获取用户登录状态失败!' + info.errorMsg);
                reject('error');
              }
            }
          })
        }
      })
    }).catch(function (reason) {
      console.log('catch:', reason);
    });
  }
这里我们使用了另外一个APIwx.setStorageSync来异步存储我们从后台接口返回登陆结果3rd_sessionId。
1.2 登陆后端接口
后端我们定义一个action登陆验证。
/**
 * 微信端用户验证
 * @param code
 * @param request
 * @return 返回一个64位的3rd_session
 */
@RequestMapping(value = "/wechat/auth/{code}")
public BaseResp<string> list(@PathVariable(value = "code") String code,HttpServletRequest request) {
	BaseResp<string> result = weChatApiService.getSessionKeyOropenid(code,request);
	return result;
}
1.3 登陆后端接口实现
实现类中主要的方法用于登陆获取session_key,之后我们根据session_key生成自己的SessionId也就是我们上面说的3rd_sessionId,这里还要做的一点是我们的服务器端要记住session_key,因为在我们获取用户信息时需要用到。可以看到,这里我放在Redis中。
@Service
public class WeChatApiServiceImpl implements WeChatApiService {

    private static final Logger logger = LoggerFactory.getLogger(WeChatApiServiceImpl.class);

    @Autowired
    private JedisUtils jedisUtils;
    @Autowired
    private StoryProperties storyProperties;

    /**
     * 获取微信小程序 session_key 和 openid
     * @param code 调用微信登陆返回的Code
     * @return
     */
    public BaseResp<String> getSessionKeyOropenid(String wxCode,HttpServletRequest request) {
        Map<String, String> requestUrlParam = new HashMap<String, String>();
        requestUrlParam.put("appid", storyProperties.getAppId()); // 开发者设置中的appId
        requestUrlParam.put("secret", storyProperties.getAppSecret()); // 开发者设置中的appSecret
        requestUrlParam.put("js_code", wxCode); // 小程序调用wx.login返回的code
        requestUrlParam.put("grant_type", "authorization_code"); // 默认参数

        // 发送post请求读取调用微信 https://api.weixin.qq.com/sns/jscode2session
        // 接口获取openid用户唯一标识
        ObjectMapper mapper = new ObjectMapper();
        WeChatLoginResp jsonObject=null;
        String thirdSession = null;
        BaseResp<String> result= null;
        try{
            String resp=sendPost(storyProperties.getWeChatSnsUrl(), requestUrlParam);
            jsonObject =mapper.readValue(resp,WeChatLoginResp.class);
//          System.out.println(resp);

            if(jsonObject.getErrcode()==null){
                //生成3rd_session
                thirdSession= RandomUtils.generateString(64);

                WeChatUserSesssion user=new WeChatUserSesssion(jsonObject.getOpenid(),jsonObject.getSession_key());
                jedisUtils.hashSet(SecurityConsts.REDIS_API_SESSION, thirdSession,user);

                result = new BaseResp<String>(thirdSession);
            }
        }catch(JsonParseException ex){
            logger.error(ex.getMessage(), ex);
        }catch(JsonMappingException ex){
            logger.error(ex.getMessage(), ex);
        }catch(IOException ex){
            logger.error(ex.getMessage(), ex);
        }
        if(result==null){
            result = new BaseResp<String>(RespCodeEnum.VALID_ERROR);
        }
        return result;
    }

    /**
     * 向指定 URL 发送POST方法的请求
     * @param url 发送请求的 URL
     * @return 所代表远程资源的响应结果
     */
    public String sendPost(String url, Map<String, ?> paramMap) {
        PrintWriter out = null;
        BufferedReader in = null;
        String result = "";

        String param = "";
        Iterator<String> it = paramMap.keySet().iterator();

        while (it.hasNext()) {
            String key = it.next();
            param += key + "=" + paramMap.get(key) + "&";
        }

        try {
            URL realUrl = new URL(url);
            URLConnection conn = realUrl.openConnection();
            conn.setRequestProperty("accept", "*/*");
            conn.setRequestProperty("connection", "Keep-Alive");
            conn.setRequestProperty("Accept-Charset", "utf-8");
            conn.setRequestProperty("user-agent", "Mozilla/4.0 (compatible; MSIE 6.0; Windows NT 5.1;SV1)");
            // 发送POST请求必须设置如下两行
            conn.setDoOutput(true);
            conn.setDoInput(true);
            // 获取URLConnection对象对应的输出流
            out = new PrintWriter(conn.getOutputStream());
            // 发送请求参数
            out.print(param);
            out.flush();
            // 定义BufferedReader输入流来读取URL的响应
            in = new BufferedReader(new InputStreamReader(conn.getInputStream(), "UTF-8"));
            String line;
            while ((line = in.readLine()) != null) {
                result += line;
            }
        } catch (Exception e) {
            logger.error(e.getMessage(), e);
        }
        finally {
            try {
                if (out != null) {
                    out.close();
                }
                if (in != null) {
                    in.close();
                }
            } catch (IOException ex) {
                ex.printStackTrace();
            }
        }
        return result;
    }
}
2. 过滤业务请求
到这里实际上登陆获取登陆信息就已经足够了。后端接口已经有了,当然,我们要做一些限制,不是任何业务上的请求都可以调用。那关于小程序调用的业务请求,我们可以在后端增加一个过滤器,对小程序开放的接口进行过滤,凡是请求头Header中不包含JSESSIONID项信息的请求,直接返回验证失败。同时我们可以验证信息项的Value是否有效,当然这个Value的值存放的是我们之前生成的3rd_sessionId,我们可以检查这个Value值是否在我们的Redis中有效。
public class ApiSessionFilter implements Filter{
     /**
     * 封装,不需要过滤的list列表
     */
    protected static List<Pattern> patterns = new ArrayList<Pattern>();

    @Override
    public void init(FilterConfig filterConfig) throws ServletException {
        patterns.add(Pattern.compile("/api/\\S+"));
    }

    @Override
    public void doFilter(ServletRequest servletRequest, ServletResponse servletResponse, FilterChain chain) throws IOException, ServletException {
        HttpServletRequest httpRequest = (HttpServletRequest) servletRequest;
        HttpServletResponse httpResponse = (HttpServletResponse) servletResponse;
        String url = httpRequest.getRequestURI().substring(httpRequest.getContextPath().length());

        if (isInclude(url)){
            if (httpRequest.getHeader("JSESSIONID")==null) {
                httpResponse.setHeader("Content-Type", "application/json;charset=utf-8");
                httpResponse.getWriter().print("{\"resultCode\":0,\"message\":\"验证失败,请重新登录!\"}");
                return;
            }
            //验证JSESSIONID 是否有效
            //...
        }
        chain.doFilter(httpRequest, httpResponse);
        return;
    }

    @Override
    public void destroy() {}

    /**
     * 是否需要过滤Url
     * @param url
     * @return
     */
    private boolean isInclude(String url) {
        for (Pattern pattern : patterns) {
            Matcher matcher = pattern.matcher(url);
            if (matcher.matches()) {
                return true;
            }
        }
        return false;
    }
}
3. 获取用户信息
获取用户信息的APIwx.getUserInfo在今年微信做出调整,使用该接口将不再出现授权弹窗,需要使用 引导用户主动进行授权操作,因此这里我们也使用button来做。
3.1 前端
<button open-type="getUserInfo" plain="true" bindgetuserinfo="onGotUserInfo">
      <img src="/images/icon/camera.png" mode="aspectFit">
    </button>
添加绑定的事件:
onGotUserInfo(e) {
    if (e.detail.rawData) {
      //用户按了允许授权按钮,更新服务端用户信息
      app.getUserInfo();
      wx.navigateTo({ url: '/pages/albumupload/upload?albumid=' + this.data.albumId });
    } else {
      console.log('用户按了拒绝按钮')
    }
  }
app.getUserInfo()是我定义在app.js中的方法,这是前端调用api接口的部分:
getUserInfo:function(){
    var _this = this;
    wx.getUserInfo({
      withCredentials: true,
      lang: "zh_CN",
      success: function (userRes) {
        _this.globalData.userInfo = userRes.rowData;
        wx.request({
          url: api.getAuthUrl('/wechat/auth-userinfo'),
          data: {
            encryptedData: userRes.encryptedData,
            iv: userRes.iv
          },
          header: {
            "Content-Type": "application/x-www-form-urlencoded",
            "JSESSIONID": wx.getStorageSync('SessionId')
          },
          method: 'POST',
          //服务端的回调
          success: function (result) {
            console.log(result);
          }
        })
      }
    });
  }
这里看到,我们在调用服务器端接口的时候,已经带上了用于验证的3rd_sessionId。
3.2 获取用户信息后端接口
在我们上面的Controller中增加新的action用于获取用户信息。首先我们会从header中拿到3rd_sessionId,在Redis中获取我们之前缓存好的Session_key,这是我们在解密用户信息时需要用到的。获取用户信息之后,我们可以存储在我们的数据库中。
/**
 * 微信端获取用户信息
 * @param encryptedData
 * @param iv
 * @param request
 * @return
 */
@PostMapping(value = "/wechat/auth-userinfo")
public BaseResp<WeChatUserInfo> getUserInfo(@RequestParam(value = "encryptedData") String encryptedData,
        @RequestParam(value = "iv") String iv,
        HttpServletRequest request) {
    BaseResp<WeChatUserInfo> result= null;
    String thirdSession = request.getHeader("JSESSIONID");
    if(!StringUtils.isEmpty(thirdSession)){
        try{
            WeChatUserSesssion user= jedisUtils.hashGet(SecurityConsts.REDIS_API_SESSION, thirdSession,WeChatUserSesssion.class);
            WeChatUserInfo userInfo = weChatApiService.getUserInfo(encryptedData, user.getSessionKey(), iv);
            //存储用户信息
            weChatUserService.persist(userInfo);
            result= new BaseResp<WeChatUserInfo>(userInfo);
        }
        catch(Exception ex){
            logger.error("LoginController.getUserInfo UserInfo Error",ex);
        }
    }
    if(result==null){
        result= new BaseResp<WeChatUserInfo>(RespCodeEnum.FAILURE);
    }
    return result;
}
3.3 获取用户信息后端接口实现
在实现类中,解密用户敏感数据。
/**
 * 解密用户敏感数据获取用户信息
 * @param sessionKey 数据进行加密签名的密钥
 * @param encryptedData 包括敏感数据在内的完整用户信息的加密数据
 * @param iv 加密算法的初始向量
 * @return
 */
public WeChatUserInfo getUserInfo(String encryptedData, String sessionKey, String iv) {
    ObjectMapper mapper = new ObjectMapper();
    WeChatUserInfo jsonObject=null;
    try {
        // 被加密的数据
        byte[] dataByte = Base64Utils.decode(encryptedData);
        // 加密秘钥
        byte[] keyByte = Base64Utils.decode(sessionKey);
        // 偏移量
        byte[] ivByte = Base64Utils.decode(iv);

        // 如果密钥不足16位,那么就补足. 这个if 中的内容很重要
        int base = 16;
        if (keyByte.length % base != 0) {
            int groups = keyByte.length / base + (keyByte.length % base != 0 ? 1 : 0);
            byte[] temp = new byte[groups * base];
            Arrays.fill(temp, (byte) 0);
            System.arraycopy(keyByte, 0, temp, 0, keyByte.length);
            keyByte = temp;
        }
        // 初始化
        Security.addProvider(BouncyCastleProviderSingleton.getInstance());

        Cipher cipher = Cipher.getInstance("AES/CBC/PKCS7Padding", "BC");
        SecretKeySpec spec = new SecretKeySpec(keyByte, "AES");
        AlgorithmParameters parameters = AlgorithmParameters.getInstance("AES");
        parameters.init(new IvParameterSpec(ivByte));
        cipher.init(Cipher.DECRYPT_MODE, spec, parameters);// 初始化
        byte[] resultByte = cipher.doFinal(dataByte);
        if (null != resultByte && resultByte.length > 0) {
            String result = new String(resultByte, "UTF-8");
            jsonObject=mapper.readValue(result,WeChatUserInfo.class);
        }
    } catch (NoSuchAlgorithmException e) {
        logger.error(e.getMessage(), e);
    } catch (NoSuchPaddingException e) {
        logger.error(e.getMessage(), e);
    } catch (InvalidParameterSpecException e) {
        logger.error(e.getMessage(), e);
    } catch (IllegalBlockSizeException e) {
        logger.error(e.getMessage(), e);
    } catch (BadPaddingException e) {
        logger.error(e.getMessage(), e);
    } catch (UnsupportedEncodingException e) {
        logger.error(e.getMessage(), e);
    } catch (InvalidKeyException e) {
        logger.error(e.getMessage(), e);
    } catch (InvalidAlgorithmParameterException e) {
        logger.error(e.getMessage(), e);
    } catch (NoSuchProviderException e) {
        logger.error(e.getMessage(), e);
    }catch(JsonParseException ex){
        logger.error(ex.getMessage(), ex);
    }catch(JsonMappingException ex){
        logger.error(ex.getMessage(), ex);
    }catch(IOException ex){
        logger.error(ex.getMessage(), ex);
    }catch(Exception ex){
        logger.error(ex.getMessage(), ex);
    }
    return jsonObject;
}
到这里,我们的登陆以及获取用户信息的功能都已经实现了。可以看到我们前端主要用到了一些微信小程序基础的API,如wx.login,wx.getUserInfo等等,微信的API文档也已经很全面,当然如一些特殊的功能还需要自己采坑来实现,如红包等等,所以从看API开始学习小程序应该是比较快速的,当然边实践是非常重要的。